概要
画像にアフィン変換を適用する仕組みについて、numpy で実装しながら解説します。
関連記事
本記事では、画像にアフィン変換を適用する仕組みを解説のため自前で実装していますが、実用上は OpenCV に用意された関数を使用します。 以下の記事を参照ください。
アフィン変換
アフィン変換 (Affine transformation) とは、線型変換と平行移動の組み合わせで表される変換です。回転、平行移動、せん断、反転などはアフィン変換の一種です。画像のように 2 次元の場合、アフィン変換は線型変換を表す行列 $A \in \mathbb{R}^{2 \times 2}$ と平行移動を表すベクトル $\bm{t} \in \mathbb{R}^2$ によって表されます。
$$ A = \begin{pmatrix} a_{11} & a_{12}\\ a_{21} & a_{22} \end{pmatrix}, \bm{t} = \begin{pmatrix} t_1\\ t_2 \end{pmatrix} $$変換前の点を $\bm{x} = (x_1, x_2)^T$ としたとき、アフィン変換後の点 $\bm{y} = (y_1, y_2)^T$ は次の式で計算できます。
$$ \bm{y} = A \bm{x} + \bm{t} = \begin{pmatrix} a_{11} & a_{12}\\ a_{21} & a_{22} \end{pmatrix} \begin{pmatrix} x_1\\ x_2 \end{pmatrix} + \begin{pmatrix} t_1\\ t_2 \end{pmatrix} $$ここで、同次座標系を導入すると、アフィン変換は (3, 3) の 1 つの行列で表すことができ、行列積で計算できるようになります。 $\bm{x}, \bm{y}$ は同次座標系でそれぞれ $\bm{x}’ = (x_1, x_2, 1)^T, \bm{y}’ = (y_1, y_2, 1)^T$ となり、先程の計算は以下のようになります。
$$ \begin{pmatrix} y_1\\ y_2\\ 1 \end{pmatrix} = \begin{pmatrix} a_{11} & a_{12} & t_1\\ a_{21} & a_{22} & t_2\\ 0 & 0 & 1 \end{pmatrix} \begin{pmatrix} x_1\\ x_2\\ 1 \end{pmatrix} $$標準座標系と画像座標系
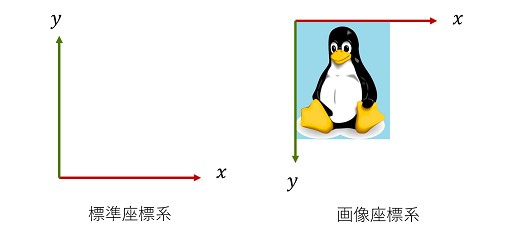
数学では 2 次元の場合、通常は右方向に $x$ 軸、上方向に $y$ 軸をとる標準座標系 (standard coordinate system) が用いられます。一方、画像処理では、画像の左上を原点とし、右方向に $x$ 軸、下方向に $y$ 軸をとる画像座標系 (image coordinate system) が用いられます。

標準座標系での変換行列は画像座標系では異なる場合があります。
標準座標系のアフィン変換行列から画像座標系の行列を求める方法
標準座標系でのアフィン変換行列がわかっている場合に、それを画像座標系でのアフィン変換行列に変換する方法について述べます。
標準座標系の基底 $\bm{e}_1 = (1, 0)^T, \bm{e}_2 = (0, 1)^T$ を画像座標系の基底 $\bm{e}’_1 = (1, 0)^T, \bm{e}’_2 = (0, -1)^T$ に変換する基底変換行列は
$$ P = \begin{pmatrix} 1 & 0 \\ 0 & -1 \\ \end{pmatrix} $$なので、標準座標系での変換行列を $A$ としたとき、$P^{-1} = P$ に注意すると、画像座標系での変換行列は $PAP$ を計算することで求められます。
例:
標準座標系で原点を中心に反時計回りに $\theta$ だけ回転する行列は以下になります。
$$ A = \begin{pmatrix} \cos \theta & -\sin \theta \\ \sin \theta & \cos \theta \\ \end{pmatrix} $$このとき、画像座標系での変換行列は
$$ P^{-1}AP = \begin{pmatrix} \cos \theta & \sin \theta \\ \sin (-\theta) & \cos \theta \\ \end{pmatrix} $$となります。$A_{21}$ が標準座標系と異なっています。
画像にアフィン変換を適用する
本項では、画像にアフィン変換を適用する方法について、numpy で実装しながら理解します。
import cv2
import numpy as np
from IPython.display import Image, display


def imshow(img):
    """ndarray 配列をインラインで Notebook 上に表示する。"""
    ret, encoded = cv2.imencode(".jpg", img)
    display(Image(encoded))
画像を $x$ 方向に $s_x$ 倍、$y$ 方向に $s_y$ 倍だけスケールするアフィン変換行列は以下になります。
$$ A = \begin{pmatrix} s_x & 0 & 0 \\ 0 & s_y & 0 \\ 0 & 0 & 1 \\ \end{pmatrix} $$def scale_matrix(sx, sy):
A = np.array(
[
[sx, 0, 0],
[0, sy, 0],
[0, 0, 1],
],
dtype=float,
)
return A
A = scale_matrix(sx=2, sy=2)
print(A)[[2. 0. 0.] [0. 2. 0.] [0. 0. 1.]]
画像にアフィン変換を適用する方法として、まず素朴に画像の画素の座標一覧を作成し、それにアフィン変換を適用することを考えます。
行列 A を画像の画素の座標一覧 src_coords に乗算し、アフィン変換後の画素の座標一覧 dst_coords を計算します。座標は float になっているので、numpy.round() で整数に丸めて、ndarray.astype(np.int64) で整数型にします。
変換したあとに出力画像の範囲内 $x \in [0, \textit{img}_w – 1], y \in [0, \textit{img}_h – 1]$ に収まっている座標のみ抽出します。
def make_grid(img_w, img_h):
    X, Y = np.indices((img_w, img_h)).reshape(2, -1)
    coords = np.vstack((X, Y, np.ones_like(X)))

    return coords


# 画像を読み込む。
img = cv2.imread("sample.jpg")
img_h, img_w = img.shape[:2]

# 画像の画素の座標一覧を作成する。
src_coords = make_grid(img_w, img_h)
src_xs, src_ys, _ = src_coords

# 入力画像の画素の座標一覧に対して、アフィン変換を行い、変換後の画素の座標一覧を求める。
dst_coords = np.round(A @ src_coords).astype(np.int64)
dst_xs, dst_ys, _ = dst_coords

# 出力画像の範囲内に収まっているインデックスを調べる。
indices = np.where((0 <= dst_xs) & (dst_xs < img_w) & (0 <= dst_ys) & (dst_ys < img_h))

# 入力画像の座標と対応するアフィン変換後の座標
src_xs, src_ys = src_xs[indices], src_ys[indices]
dst_xs, dst_ys = dst_xs[indices], dst_ys[indices]
以上で入力画像の座標とアフィン変換後の座標の対応関係が求められました。
まず、numpy.zeros_like(img) で背景が黒の画像を作成し、求めた対応関係に基づき、出力画像の画素に入力画像の画素を代入します。
# 出力画像を作成する。
out = np.zeros_like(img)
out[dst_ys, dst_xs] = img[src_ys, src_xs]

imshow(out)
結果を見ると、たしかに $x$ 方向に 2 倍、$y$ 方向に 2 倍されているようですが、色がない点が目立ちます。 この現象は、入力画像の画素と対応関係がない出力画像の画素は、入力画像の画素が代入されないことが原因です。
これを防ぐために、逆に出力画像の画素の座標一覧を作成し、逆のアフィン変換を行い、変換前の画素の座標一覧を求めるようにします。逆のアフィン変換行列は、元の行列の逆行列になります。
逆行列は numpy.linalg.inv() で求められます。
def make_grid(img_w, img_h):
    X, Y = np.indices((img_w, img_h)).reshape(2, -1)
    coords = np.vstack((X, Y, np.ones_like(X)))

    return coords


# 画像を読み込む。
img = cv2.imread("sample.jpg")
img_h, img_w = img.shape[:2]

# 出力画像の画素の座標一覧を作成する。
dst_coords = make_grid(img_w, img_h)
dst_xs, dst_ys, _ = dst_coords

# 出力画像の画素の座標一覧に対して、逆のアフィン変換を行い、変換前の画素の座標一覧を求める。
inv_A = np.linalg.inv(A)
src_coords = np.round(inv_A @ dst_coords).astype(np.int64)
src_xs, src_ys, _ = src_coords

# 入力画像の範囲内に収まっているインデックスを調べる。
indices = np.where((0 <= src_xs) & (src_xs < w) & (0 <= src_ys) & (src_ys < h))
src_xs, src_ys = src_xs[indices], src_ys[indices]
dst_xs, dst_ys = dst_xs[indices], dst_ys[indices]

# 出力画像を作成する。
out = np.zeros_like(img)
out[dst_ys, dst_xs] = img[src_ys, src_xs]

imshow(out)
今度は、すべての画素に色がつきました。
アフィン変換の種類
代表的なアフィン変換の種類を紹介します。
拡大縮小
$x$ 軸方向に $s_x$、$y$ 軸方向に $s_y$ だけ拡大縮小 (scaling) するアフィン変換行列です。
| 標準座標系 | 画像座標系 |
|---|---|
| $$\begin{pmatrix} s_x & 0 & 0 \\ 0 & s_y & 0 \\ 0 & 0 & 1 \\ \end{pmatrix}$$ | $$\begin{pmatrix} s_x & 0 & 0 \\ 0 & s_y & 0 \\ 0 & 0 & 1 \\ \end{pmatrix}$$ |
例: $x$ 軸方向に 1.2 倍、$y$ 軸方向に 0.8 倍する変換
回転
原点を中心に反時計回りに $\theta$ だけ回転 (rotation) するアフィン変換行列です。
| 標準座標系 | 画像座標系 |
|---|---|
| $\begin{pmatrix} \cos \theta & -\sin \theta & 0 \\ \sin \theta & \cos \theta & 0 \\ 0 & 0 & 1 \\ \end{pmatrix}$ | $\begin{pmatrix} \cos \theta & \sin \theta & 0 \\ \sin (-\theta) & \cos \theta & 0 \\ 0 & 0 & 1 \\ \end{pmatrix}$ |
例: 原点を中心に反時計回りに 30° 回転する変換
平行移動
$x$ 軸方向に $t_x$、$y$ 軸方向に $t_y$ だけ平行移動 (translation) するアフィン変換行列です。
| 標準座標系 | 画像座標系 |
|---|---|
| $\begin{pmatrix} 1 & 0 & t_x \\ 0 & 1 & t_y \\ 0 & 0 & 1 \\ \end{pmatrix}$ | $\begin{pmatrix} 1 & 0 & t_x \\ 0 & 1 & t_y \\ 0 & 0 & 1 \\ \end{pmatrix}$ |
例: $x$ 軸方向に 60、$y$ 軸方向に 30 だけ平行移動する変換
反転
$x$ 軸に対して反転するアフィン変換行列です。
| 標準座標系 | 画像座標系 |
|---|---|
| $\begin{pmatrix} -1 & 0 & 0 \\ 0 & 1 & 0 \\ 0 & 0 & 1 \\ \end{pmatrix}$ | $\begin{pmatrix} -1 & 0 & 0 \\ 0 & 1 & 0 \\ 0 & 0 & 1 \\ \end{pmatrix}$ |
$y$ 軸に対して反転するアフィン変換行列です。
| 標準座標系 | 画像座標系 |
|---|---|
| $\begin{pmatrix} 1 & 0 & 0 \\ 0 & -1 & 0 \\ 0 & 0 & 1 \\ \end{pmatrix}$ | $\begin{pmatrix} 1 & 0 & 0 \\ 0 & -1 & 0 \\ 0 & 0 & 1 \\ \end{pmatrix}$ |
せん断
水平せん断 (sheer) するアフィン変換行列です。
| 標準座標系 | 画像座標系 |
|---|---|
| $\begin{pmatrix} 1 & \lambda & 0 \\ 0 & 1 & 0 \\ 0 & 0 & 1 \\ \end{pmatrix}$ | $\begin{pmatrix} 1 & -\lambda & 0 \\ 0 & 1 & 0 \\ 0 & 0 & 1 \\ \end{pmatrix}$ |
鉛直せん断 (sheer) するアフィン変換行列です。
| 標準座標系 | 画像座標系 |
|---|---|
| $\begin{pmatrix} 1 & 0 & 0 \\ \lambda & 1 & 0 \\ 0 & 0 & 1 \\ \end{pmatrix}$ | $\begin{pmatrix} 1 & 0 & 0 \\ -\lambda & 1 & 0 \\ 0 & 0 & 1 \\ \end{pmatrix}$ |
アフィン変換の逆行列を計算する
アフィン変換行列の逆行列を求める手順について説明します。 アフィン変換行列は次の形式を持っています:
$$ A = \begin{pmatrix} a & b & c \\ d & e & f \end{pmatrix} $$ここで、行列 $A$ は以下の形式で書けます:
$$ A = \begin{pmatrix} \mathbf{M} & \mathbf{t} \end{pmatrix} $$$$ \mathbf{M} = \begin{pmatrix} a & b \\ d & e \end{pmatrix}, \quad \mathbf{t} = \begin{pmatrix} c \\ f \end{pmatrix} $$逆行列を求めるための手順は以下の通りです:
線形部分(2×2 行列)の逆行列を求める:
$$ \mathbf{M}^{-1} = \begin{pmatrix} a & b \\ d & e \end{pmatrix}^{-1} = \frac{1}{ae – bd} \begin{pmatrix} e & -b \\ -d & a \end{pmatrix} $$
新しい平行移動部分を計算する:
$$ \mathbf{t}’ = -\mathbf{M}^{-1} \mathbf{t} $$
逆アフィン変換行列を構成する: $$ A^{-1} = \begin{pmatrix} \mathbf{M}^{-1} & \mathbf{t}’ \end{pmatrix} $$
def invert_affine(A):
    M = A[:, :2]
    t = A[:, 2]

    inv_M = np.linalg.inv(M)
    inv_t = -inv_M @ t

    inv_A = np.hstack([inv_M, inv_t[:, np.newaxis]])

    return inv_A


A = cv2.getRotationMatrix2D((100, 100), 30, 1.2)
inv_A = invert_affine(A)
print(A, inv_A, sep="\n")
[[ 1.03923048 0.6 -63.92304845] [ -0.6 1.03923048 56.07695155]] [[ 0.72168784 -0.41666667 69.49788302] [ 0.41666667 0.72168784 -13.83545032]]
OpenCV の cv2.invertAffineTransform() を使用して計算することもできます。
A = cv2.getRotationMatrix2D((100, 100), 30, 1.2)
inv_A = cv2.invertAffineTransform(A)
print(A, inv_A, sep="\n")
[[ 1.03923048 0.6 -63.92304845] [ -0.6 1.03923048 56.07695155]] [[ 0.72168784 -0.41666667 69.49788302] [ 0.41666667 0.72168784 -13.83545032]]


コメント