目次
概要
OpenCV で読み込んだ画像を格子状に分割して複数枚の画像にする、また同じサイズの複数枚の画像を格子状に並べて 1 枚の画像にする方法について解説します。
1 枚の画像を格子状に分割して複数枚の画像にする

行数、列数を指定して、分割する場合
OpenCV で読み込んだ画像は 2 次元または 3 次元配列なので、numpy.array_split() を使用して、分割します。

まず indices_or_sections=行数, axis=0 として、画像を行方向に分割します。
In [1]:
# hide_cell
import cv2
import numpy as np
from IPython.display import Image, display


def imshow(img):
    """numpy 配列を Notebook 上に表示する。"""
    encoded = cv2.imencode(".jpg", img)[1]
    display(Image(encoded))


img = cv2.imread("sample.jpg")

rows = 5  # 行数
cols = 7  # 列数

shreds = []
for i, shred in enumerate(np.array_split(img, rows, axis=0)):
    if i != 0:
        shred = np.pad(shred, ((5, 0), (0, 0), (0, 0)), constant_values=255)
    shreds.append(shred)

imshow(np.concatenate(shreds, axis=0))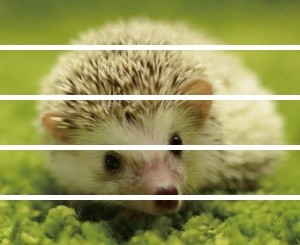
次に indices_or_sections=列数, axis=1 として、画像を列方向に分割します。
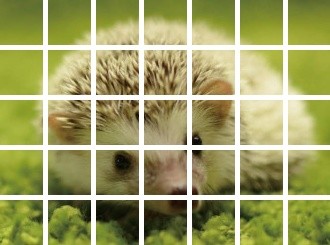
行数を 5、列数を 7 としたので、全部で 35 枚の画像に分割されました。
分割した画像は output ディレクトリを作成して、そこに保存します。
In [1]:
import cv2
import numpy as np
from IPython.display import Image, display


def imshow(img):
    """numpy 配列を Notebook 上に表示する。"""
    encoded = cv2.imencode(".jpg", img)[1]
    display(Image(encoded))
In [2]:
from pathlib import Path

import cv2
import numpy as np


def split_img(rows, cols):
    chunks = []
    for row_img in np.array_split(img, rows, axis=0):
        for chunk in np.array_split(row_img, cols, axis=1):
            chunks.append(chunk)

    return chunks


img = cv2.imread("sample.jpg")

chunks = split_img(rows=5, cols=7)
print(len(chunks))

# 保存する。
output_dir = Path("output")
output_dir.mkdir(exist_ok=True)
for i, chunk in enumerate(chunks):
    save_path = output_dir / f"chunk_{i:02d}.png"
    cv2.imwrite(str(save_path), chunk)
35
分割後の画像の大きさを指定して分割する場合
分割後の画像の大きさから、行数、列数を逆算します。
- 行数 = 画像の高さ / 分割後の画像の高さ
- 列数 = 画像の幅 / 分割後の画像の幅
除算の結果は、端数を切り捨てる場合は numpy.floor()、切り捨てない場合は numpy.ceil() を使って整数にします。
それ以外の部分は先のコードと同じです。
In [3]:
from pathlib import Path

import cv2
import numpy as np


def split_img(size):
    rows = int(np.ceil(img.shape[0] / size[0]))  # 行数
    cols = int(np.ceil(img.shape[1] / size[1]))  # 列数

    chunks = []
    for row_img in np.array_split(img, rows, axis=0):
        for chunk in np.array_split(row_img, cols, axis=1):
            chunks.append(chunk)
    print(len(chunks))


img = cv2.imread("sample.jpg")

chunk = split_img(size=(64, 64))

# 保存する。
output_dir = Path("output")
output_dir.mkdir(exist_ok=True)
for i, chunk in enumerate(chunks):
    save_path = output_dir / f"chunk_{i:02d}.png"
    cv2.imwrite(str(save_path), chunk)
20
同じサイズの複数枚の画像を格子状に並べて 1 枚の画像にする
同じサイズの複数枚の画像を格子状に並べて 1 枚の画像にするコードを紹介します。
今回は例として、sklearn.datasets.fetch_openml() で大きさが (28, 28) の 100 枚の手書き数字画像を 10 行 10 列の格子状に並べて、1 枚の画像にします。
In [4]:
from sklearn.datasets import fetch_openml

# ダウンロードが発生するので、実行に少し時間がかかります。
mnist = fetch_openml("mnist_784", version=1)
imgs = mnist["data"].values.reshape(-1, 28, 28).astype(np.uint8)[:100]
print(imgs.shape)
(100, 28, 28)
In [5]:
def concat_grid(imgs, cols, background=(255, 255, 255), gap=5):
    rows = int(np.ceil(len(imgs) / cols))

    # 出力画像の大きさを計算する。
    cell_w, cell_h = imgs[0].shape[1], imgs[0].shape[0]
    img_w = cell_w * cols + gap * (cols - 1)
    img_h = cell_h * rows + gap * (rows - 1)
    dst = np.full((img_h, img_w, 3), background, dtype=np.uint8)

    # 画像を配置する。
    for i, img in enumerate(imgs):
        row = i // cols
        col = i % cols
        x = (cell_w + gap) * col
        y = (cell_h + gap) * row

        if img.ndim == 2:
            img_bgr = cv2.cvtColor(img, cv2.COLOR_GRAY2BGR)
        dst[y : y + img.shape[0], x : x + img.shape[1]] = img_bgr

    return dst


dst = concat_grid(imgs, cols=10, gap=3)
imshow(dst)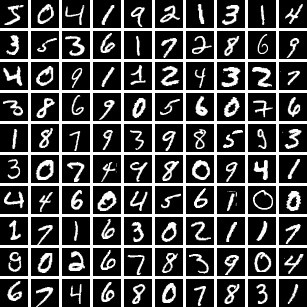
コメント