概要
torchvision で提供されている学習済みのモデルを紹介し、推論を行う方法について解説します。
学習済みのモデル
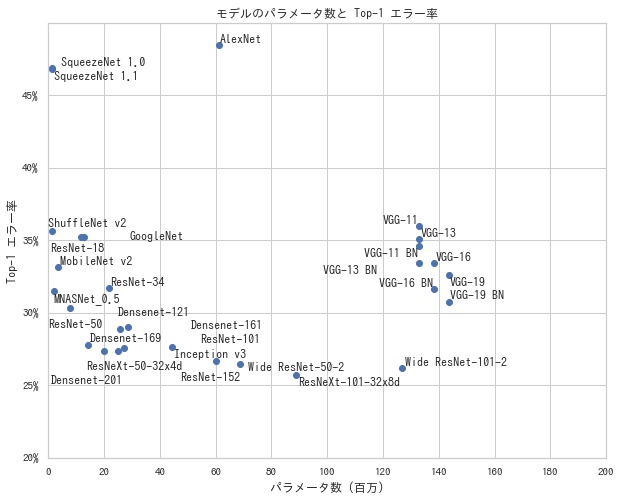
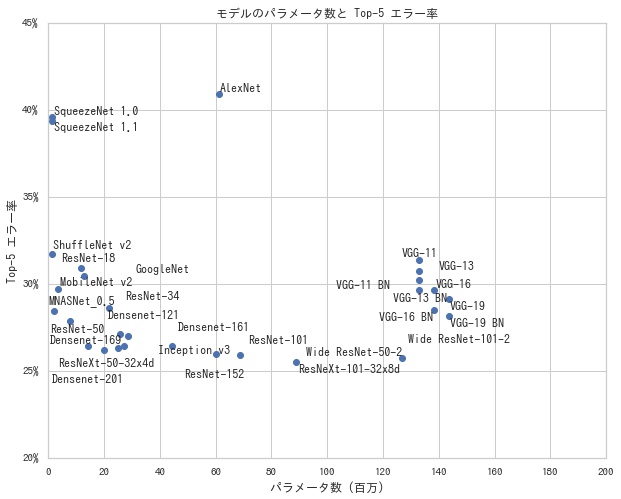
torchvision では、以下のモデルが提供されています。 これらのモデルでは、ImageNet の1000クラス分類問題を学習した重みが使えるようになっており、転移学習や fine-tuning に利用できます。
- パラメータ数: モデルを構成するパラメータ数を表す。パラメータが多いほど、モデルの表現力が上がるため、精度はよくなる傾向があるが、一方で計算量が増る
- Top-1 エラー率: ImageNet データセットでの確率が一番高い予測ラベルが正解ラベルと一致していない割合
- Top-5 エラー率: ImageNet データセットでの確率が高い上位5個の予測ラベルに正解ラベルが含まれていない割合
一般に、Top-k エラー率は、ImageNet データセットでの確率が高い上位 $k$ 個の予測ラベルに正解ラベルが含まれていない割合を表します。Top-k エラー率が低いほど、精度がよいモデルといえます。
パラメータ数と Top-1 エラー率、Top-5 エラー率の関係をそれぞれ描画すると、以下のようになります。 左下のモデルほど、パラメータが少なく、精度がいいモデルということになります。
学習済みモデルで推論する
モデルを作成する際に pretrained=True を指定すると、ImageNet の1000クラス分類問題を学習した重みでモデルが初期化されます。ResNet-50 の学習済みモデルを使い、画像の推論を行う例を以下で紹介します。
必要なモジュールを import する
import json
from pathlib import Path

import numpy as np
import torch
import torchvision
from PIL import Image
from torch.nn import functional as F
from torch.utils.data import DataLoader, Dataset
from torchvision import transforms
from torchvision.datasets.utils import download_url
デバイスを作成する
def get_device(use_gpu):
    if use_gpu and torch.cuda.is_available():
        # これを有効にしないと、計算した勾配が毎回異なり、再現性が担保できない。
        torch.backends.cudnn.deterministic = True
        return torch.device("cuda")
    else:
        return torch.device("cpu")


# デバイスを選択する。
device = get_device(use_gpu=True)
モデルを作成する
resnet50(pretrained=True) で学習済みの重みを使用した ResNet-50 を作成します。作成後、to(device) で計算を行うデバイスに転送します。
model = torchvision.models.resnet50(pretrained=True).to(device)Transforms を作成する
ImageNet の学習済みモデルで推論を行う際は以下の前処理が必要となります。
- (256, 256) にリサイズする
- 画像の中心に合わせて、(224, 224) で切り抜く
- RGB チャンネルごとに平均 (0.485, 0.456, 0.406)、分散 (0.229, 0.224, 0.225) で標準化する
これらの処理を行う Transforms を作成します。
transform = transforms.Compose(
    [
        transforms.Resize(256),  # (256, 256) で切り抜く。
        transforms.CenterCrop(224),  # 画像の中心に合わせて、(224, 224) で切り抜く
        transforms.ToTensor(),  # テンソルにする。
        transforms.Normalize(
            mean=[0.485, 0.456, 0.406], std=[0.229, 0.224, 0.225]
        ),  # 標準化する。
    ]
)
画像を読み込む
以下の手順でモデルに流せる状態にします。
- Transforms は Pillow の画像形式が対応しているので、PIL.Image.open() で読み込む。
- Transforms で変換し、テンソルにする。
unsqueeze(0)でバッチ次元を追加する。形状を (C, H, W) から (1, C, H, W) にする。to(device)で計算を行うデバイスに転送する。
img = Image.open("sample.jpg")
inputs = transform(img)
inputs = inputs.unsqueeze(0).to(device)
推論する
eval() でモデルを推論モードに設定したら、順伝搬を行います。
model.eval()
outputs = model(inputs)
推論結果を解釈する
モデルの出力結果を解釈します。torchvision のモデルは softmax をとる前の結果なので、softmax(outputs, dim=1) で softmax を計算します。その後、sort(dim=1, descending=True) で確率が高い順にソートし、確率及び対応するクラス ID の一覧を取得します。
batch_probs = F.softmax(outputs, dim=1)
batch_probs, batch_indices = batch_probs.sort(dim=1, descending=True)
クラス ID だと何のクラスを表しているかわからないので、クラス名の一覧が記載されたファイルを Web 上から取得します。
def get_classes():
    if not Path("data/imagenet_class_index.json").exists():
        # ファイルが存在しない場合はダウンロードする。
        download_url("https://git.io/JebAs", "data", "imagenet_class_index.json")

    # クラス一覧を読み込む。
    with open("data/imagenet_class_index.json") as f:
        data = json.load(f)
        class_names = [x["ja"] for x in data]

    return class_names


# クラス名一覧を取得する。
class_names = get_classes()
確率が高い上位3クラスの名前及び確率を出力します。
for probs, indices in zip(batch_probs, batch_indices):
    for k in range(3):
        print(f"Top-{k + 1} {class_names[indices[k]]} {probs[k]:.2%}")
Top-1 ポメラニアン 97.72% Top-2 パピヨン 0.42% Top-3 キースホンド 0.40%
DataLoader を使って推論する
先程は1枚の画像を PIL.Image.open() で読み込み、推論を行いました。今度は DataLoader を利用して複数枚の画像をミニバッチ単位で一度に推論する方法を紹介します。
Dataset を作成する
まずは、指定したディレクトリ (data とします) 内にある画像一覧を読み込む Dataset を作成します。この Dataset を使って、Dataloader を作成します。
data
├── apple.jpg
├── cat.jpg
├── dog.jpg
├── imagenet_class_index.json
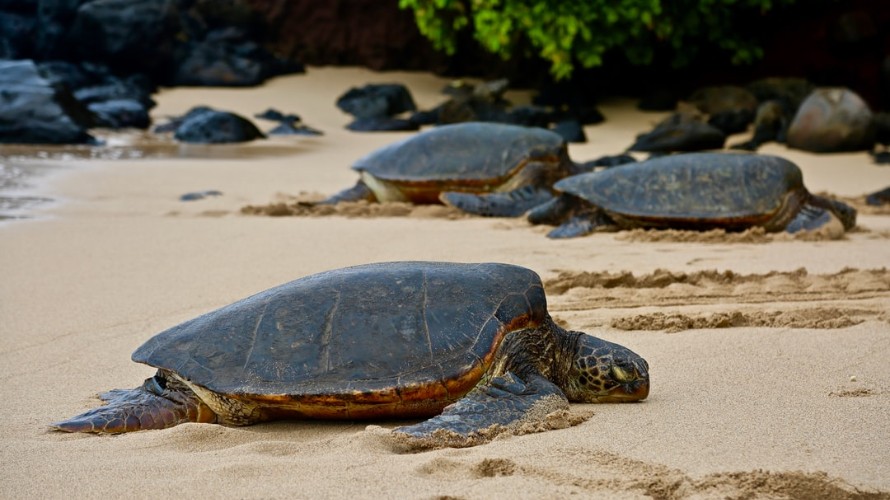
├── sea_turtle.jpg
└── traffic_light.jpgdef _get_img_paths(img_dir):
img_dir = Path(img_dir)
img_extensions = [".jpg", ".jpeg", ".png", ".bmp"]
img_paths = [str(p) for p in img_dir.iterdir() if p.suffix in img_extensions]
img_paths.sort()
return img_paths
class ImageFolder(Dataset):
def __init__(self, img_dir, transform):
# 画像ファイルのパス一覧を取得する。
self.img_paths = _get_img_paths(img_dir)
self.transform = transform
def __getitem__(self, index):
path = self.img_paths[index]
img = Image.open(path)
inputs = self.transform(img)
return {"image": inputs, "path": path}
def __len__(self):
return len(self.img_paths)
# Dataset を作成する。
dataset = ImageFolder("data", transform)
# DataLoader を作成する。
dataloader = DataLoader(dataset, batch_size=8)各画像を推論し、結果を表示します。(Jupyter Notebook 上で実行する)
from IPython import display

for batch in dataloader:
    inputs = batch["image"].to(device)
    outputs = model(inputs)

    batch_probs = F.softmax(outputs, dim=1)

    batch_probs, batch_indices = batch_probs.sort(dim=1, descending=True)

    for probs, indices, path in zip(batch_probs, batch_indices, batch["path"]):
        display.display(display.Image(path, width=224))
        print(f"path: {path}")
        for k in range(3):
            print(f"Top-{k + 1} {probs[k]:.2%} {class_names[indices[k]]}")
path: data/apple.jpg Top-1 17.94% ザクロ Top-2 16.04% リンゴ Top-3 11.18% 口紅
path: data/cat.jpg
Top-1 99.13% エジプトの猫
Top-2 0.66% タビー
Top-3 0.15% 虎猫

path: data/dog.jpg
Top-1 34.79% ラブラドル・レトリーバー犬
Top-2 13.69% ゴールデンレトリバー
Top-3 13.57% ローデシアン・リッジバック
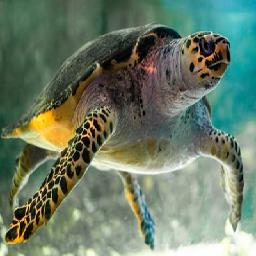
path: data/sea_turtle.jpg
Top-1 75.74% とんちき
Top-2 23.19% オサガメ
Top-3 0.90% テラピン
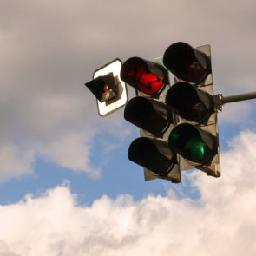
path: data/traffic_light.jpg
Top-1 99.95% 交通信号灯
Top-2 0.01% 道路標識
Top-3 0.00% スポットライト
上手く推論できていることが確認できました。torchvision の学習済みモデルを使って正しく推論できるのは、ImageNet の1000クラスに含まれるクラスだけになります。1000クラスに含まれないクラスの分類を行いたい場合は、fine-tuning または転移学習を行う必要があります。

コメント