
概要
Pytorch で中間層の出力を取得する方法について解説します。
手順
必要なモジュールを import する
import torch
import torchvision
from PIL import Image
from torchvision import transforms
画像を読み込む
以下の画像を使用します。

def get_device(gpu_id=-1):
    if gpu_id >= 0 and torch.cuda.is_available():
        return torch.device("cuda", gpu_id)
    else:
        return torch.device("cpu")


# デバイスを選択する。
device = get_device(gpu_id=0)

# Transforms を作成する
transform = transforms.Compose(
    [
        transforms.Resize(256),
        transforms.CenterCrop(224),
        transforms.ToTensor(),
        transforms.Normalize(mean=[0.485, 0.456, 0.406], std=[0.229, 0.224, 0.225]),
    ]
)

# 画像を読み込む
img = Image.open("sample.jpg")
inputs = transform(img)
inputs = inputs.unsqueeze(0).to(device)
モデルを作成する
例として、torchvision の VGG16 モデルを使用します。
Pytorch では、各層 (例: Conv2d、ReLU) や複数の層をまとめたもの (例: Sequential)、またモデル自体もモジュール (torch.nn.Module) として表されます。
モデルを構成するモジュール構成がどうなっているかは、定義方法によって異なるので、ソースコード (VGG16 の場合、vgg.py) で確認します。
今回は、2つ目の畳み込み層後に活性化関数 ReLU を適用したあとの出力を抽出してみます。
2つ目の畳み込み層後の活性化関数 ReLU を表すモジュールは model.features[3] です。
# モデルを作成する
model = torchvision.models.vgg16(pretrained=True).to(device)def print_model(module, name="model", depth=0):
if len(list(module.named_children())) == 0:
print(f"{' ' * depth} {name}: {module}")
else:
print(f"{' ' * depth} {name}: {type(module)}")
for child_name, child_module in module.named_children():
if isinstance(module, torch.nn.Sequential):
child_name = f"{name}[{child_name}]"
else:
child_name = f"{name}.{child_name}"
print_model(child_module, child_name, depth + 1)
print_model(model)model: <class 'torchvision.models.vgg.VGG'> model.features: <class 'torch.nn.modules.container.Sequential'> model.features[0]: Conv2d(3, 64, kernel_size=(3, 3), stride=(1, 1), padding=(1, 1)) model.features[1]: ReLU(inplace=True) model.features[2]: Conv2d(64, 64, kernel_size=(3, 3), stride=(1, 1), padding=(1, 1)) model.features[3]: ReLU(inplace=True) model.features[4]: MaxPool2d(kernel_size=2, stride=2, padding=0, dilation=1, ceil_mode=False) model.features[5]: Conv2d(64, 128, kernel_size=(3, 3), stride=(1, 1), padding=(1, 1)) model.features[6]: ReLU(inplace=True) model.features[7]: Conv2d(128, 128, kernel_size=(3, 3), stride=(1, 1), padding=(1, 1)) model.features[8]: ReLU(inplace=True) model.features[9]: MaxPool2d(kernel_size=2, stride=2, padding=0, dilation=1, ceil_mode=False) model.features[10]: Conv2d(128, 256, kernel_size=(3, 3), stride=(1, 1), padding=(1, 1)) model.features[11]: ReLU(inplace=True) model.features[12]: Conv2d(256, 256, kernel_size=(3, 3), stride=(1, 1), padding=(1, 1)) model.features[13]: ReLU(inplace=True) model.features[14]: Conv2d(256, 256, kernel_size=(3, 3), stride=(1, 1), padding=(1, 1)) model.features[15]: ReLU(inplace=True) model.features[16]: MaxPool2d(kernel_size=2, stride=2, padding=0, dilation=1, ceil_mode=False) model.features[17]: Conv2d(256, 512, kernel_size=(3, 3), stride=(1, 1), padding=(1, 1)) model.features[18]: ReLU(inplace=True) model.features[19]: Conv2d(512, 512, kernel_size=(3, 3), stride=(1, 1), padding=(1, 1)) model.features[20]: ReLU(inplace=True) model.features[21]: Conv2d(512, 512, kernel_size=(3, 3), stride=(1, 1), padding=(1, 1)) model.features[22]: ReLU(inplace=True) model.features[23]: MaxPool2d(kernel_size=2, stride=2, padding=0, dilation=1, ceil_mode=False) model.features[24]: Conv2d(512, 512, kernel_size=(3, 3), stride=(1, 1), padding=(1, 1)) model.features[25]: ReLU(inplace=True) model.features[26]: Conv2d(512, 512, kernel_size=(3, 3), stride=(1, 1), padding=(1, 1)) model.features[27]: ReLU(inplace=True) model.features[28]: Conv2d(512, 512, kernel_size=(3, 3), stride=(1, 1), padding=(1, 1)) model.features[29]: ReLU(inplace=True) model.features[30]: MaxPool2d(kernel_size=2, stride=2, padding=0, dilation=1, ceil_mode=False) model.avgpool: AdaptiveAvgPool2d(output_size=(7, 7)) model.classifier: <class 'torch.nn.modules.container.Sequential'> model.classifier[0]: Linear(in_features=25088, out_features=4096, bias=True) model.classifier[1]: ReLU(inplace=True) model.classifier[2]: Dropout(p=0.5, inplace=False) model.classifier[3]: Linear(in_features=4096, out_features=4096, bias=True) model.classifier[4]: ReLU(inplace=True) model.classifier[5]: Dropout(p=0.5, inplace=False) model.classifier[6]: Linear(in_features=4096, out_features=1000, bias=True)
中間層の出力を取得する (forward_hook() を使用する方法)
まず、出力を取得したいモジュールに中間層の出力を記録するコールバック関数を登録します。
torch.nn.Module.register_forward_hook() でコールバック関数を登録しておくと、順伝搬にその関数が呼び出されます。コールバック関数は、モジュール module、そのモジュールの入力 inputs、そのモジュールの出力 outputs の3つの引数をとる関数になります。
def forward_hook(module, inputs, outputs):
    # 処理
コールバック関数を登録したら、順伝搬して、中間層の出力を取得します。
def extract(target, inputs):
    feature = None

    def forward_hook(module, inputs, outputs):
        # 順伝搬の出力を features というグローバル変数に記録する
        global features
        # 1. detach でグラフから切り離す。
        # 2. clone() でテンソルを複製する。モデルのレイヤーで ReLU(inplace=True) のように
        #    inplace で行う層があると、値がその後のレイヤーで書き換えられてまい、
        #    指定した層の出力が取得できない可能性があるため、clone() が必要。
        features = outputs.detach().clone()

    # コールバック関数を登録する。
    handle = target.register_forward_hook(forward_hook)

    # 推論する
    model.eval()
    model(inputs)

    # コールバック関数を解除する。
    handle.remove()

    return features


# 抽出対象の層
target_module = model.features[3]  # (3): ReLU(inplace=True)

features = extract(target_module, inputs)
print(features.shape)
# torch.Size([1, 64, 224, 224])
torch.Size([1, 64, 224, 224])
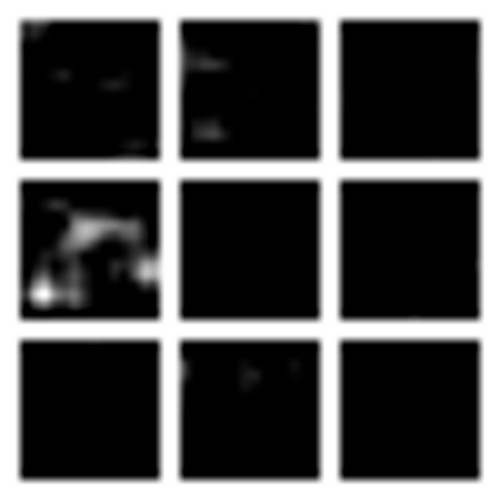
中間層の出力を可視化する
抽出した出力は、出力数が64の畳み込み層の出力に ReLU を適用したものなので、64枚の大きさが (244, 224) のグレースケール画像として可視化します。
def feature_to_img(feature, nrow=4):
    # (N, H, W) -> (N, C, H, W)
    feature = feature.unsqueeze(1)
    # 画像化して、格子状に並べる
    img = torchvision.utils.make_grid(feature.cpu(), nrow=nrow, normalize=True, pad_value=1)
    # テンソル -> PIL Image
    img = transforms.functional.to_pil_image(img)
    # リサイズする。
    new_w = 500
    new_h = int(new_w * img.height / img.width)
    img = img.resize((new_w, new_h))

    return img

# (1, 64, H, W) のうち、16枚を可視化する。
img = feature_to_img(features[0][:16])
img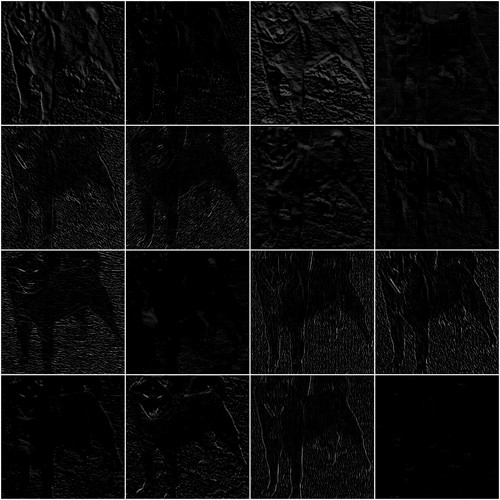
中間層の出力を取得する (create_feature_extractor() を使用する方法)
create_feature_extractor() を使用して、既存のモデルから中間層を出力するモデルを新たに作成する方法もあります。第2引数に抽出対象のノード名を指定します。
{抽出対象のノード名: 名前}を dict で指定した場合、推論した際に{名前: 抽出対象のノードの出力}の dict を返すモデルが作成できます。抽出対象のノード名を list で指定した場合、推論した際に{抽出対象のノード名: 抽出対象のノードの出力}の dict を返すモデルが作成できます。
抽出対象のノード名に指定する名前は get_graph_node_names() で確認できます。
names = torchvision.models.feature_extraction.get_graph_node_names(model)
print(names)
(['x', 'features.0', 'features.1', 'features.2', 'features.3', 'features.4', 'features.5', 'features.6', 'features.7', 'features.8', 'features.9', 'features.10', 'features.11', 'features.12', 'features.13', 'features.14', 'features.15', 'features.16', 'features.17', 'features.18', 'features.19', 'features.20', 'features.21', 'features.22', 'features.23', 'features.24', 'features.25', 'features.26', 'features.27', 'features.28', 'features.29', 'features.30', 'avgpool', 'flatten', 'classifier.0', 'classifier.1', 'classifier.2', 'classifier.3', 'classifier.4', 'classifier.5', 'classifier.6'], ['x', 'features.0', 'features.1', 'features.2', 'features.3', 'features.4', 'features.5', 'features.6', 'features.7', 'features.8', 'features.9', 'features.10', 'features.11', 'features.12', 'features.13', 'features.14', 'features.15', 'features.16', 'features.17', 'features.18', 'features.19', 'features.20', 'features.21', 'features.22', 'features.23', 'features.24', 'features.25', 'features.26', 'features.27', 'features.28', 'features.29', 'features.30', 'avgpool', 'flatten', 'classifier.0', 'classifier.1', 'classifier.2', 'classifier.3', 'classifier.4', 'classifier.5', 'classifier.6'])
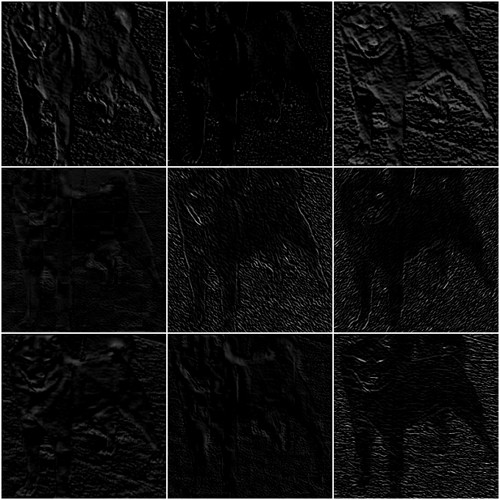
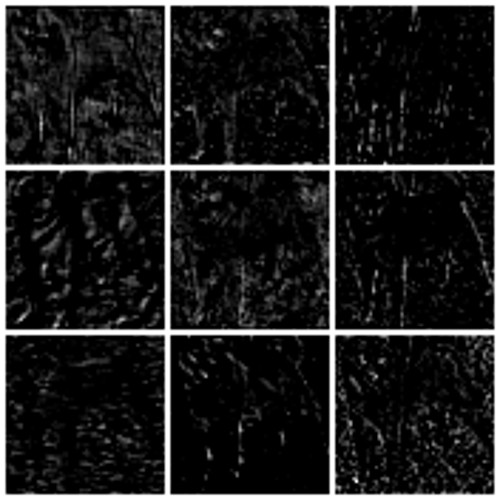
extractor = torchvision.models.feature_extraction.create_feature_extractor(
    model, ["features.3", "features.11", "features.18", "features.29"]
)

features2 = extractor(inputs)

for name, x in features2.items():
    feature_to_img(features[0])
    img = feature_to_img(x[0][:9], nrow=3)
    print(name, x.shape)
    display(img)
features.3 torch.Size([1, 64, 224, 224])
features.11 torch.Size([1, 256, 56, 56])
features.18 torch.Size([1, 512, 28, 28])
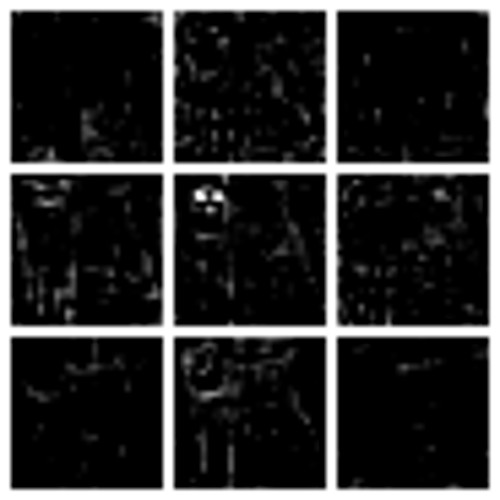
features.29 torch.Size([1, 512, 14, 14])
コメント