概要
CNN を使用した GAN の一種である DCGAN (Deep Convolutional Generative Adversarial Networks) について解説します。
DCGAN
GAN については Pytorch – GAN の仕組みと Pytorch による実装例 – pystyle を参照してください。前の記事では、全結合層のみの Generator 及び Discriminator を作成して、MNIST データセットの生成モデルを作成しました。画像を1次元配列に潰してしまうと、位置関係の情報が失われてしまうため、MNIST のような簡単な画像であればそれでも十分ですが、人の顔であったりより複雑な画像を生成したい場合は Generator 及び Discriminator に CNN を使うことが有効です。 GAN の学習はハイパーパラメータなどに左右され難しいのですが、DCGAN の論文では、学習が上手くいくモデル構造や学習率などのハイパーパラメータなどを提示しました。
Pytorch の実装例
モデルが CNN になることを除いて GAN の記事と内容はほぼ同じです。
モジュールを import する
import random

import matplotlib.pyplot as plt
import numpy as np
import pandas as pd
from IPython.display import display
from tqdm.notebook import tqdmimport torch
import torch.nn as nn
import torch.optim as optim
import torchvision
from torchvision import datasets, transforms# 再現性確保のため、シードを固定する。
torch.manual_seed(0)
random.seed(0)各種パラメータを設定する
# モデルの入力サイズ
img_size = 64

# バッチサイズ
batch_size = 256

# ノイズの次元数
latent_dim = 100

# エポック数
n_epochs = 10

# 学習率
lr = 0.0002

# beta1 (Adam のパラメータ)
beta1 = 0.5
デバイスを選択する
def get_device(gpu_id=-1):
    if gpu_id >= 0 and torch.cuda.is_available():
        return torch.device("cuda", gpu_id)
    else:
        return torch.device("cpu")


device = get_device(gpu_id=0)
CelebA データセット
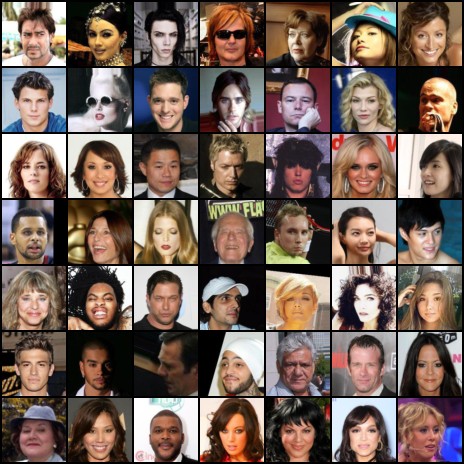
Large-scale CelebFaces Attributes (CelebA) Dataset は、有名人の顔画像を集めたデータセットです。今回はこのデータセットを使って、DCGAN で顔画像の生成モデルを作成します。 torchvision の torchvision.datasets.CelebA で提供されています。
Transform、Dataset、DataLoader を作成する
画像に対して、以下の前処理を行います。
- Resize() でモデルの入力サイズ (img_size, img_size) に収まるようにアスペクト比を固定してリサイズする
- CenterCrop() でモデルの入力サイズ (img_size, img_size) になるようにパディングを行う
- ToTensor() で PIL Image をテンソルに変換する
- Normalize() で値の範囲を $[-1, 1]$ に正規化する
標準化とは、$\frac{x – \text{mean}}{\text{std}}$ であるため、$\text{mean} = 0.5, \text{std} = 0.5$ とすると、値の範囲が $[-1, 1]$ になります。
# Transform を作成する。
transform = transforms.Compose(
    [
        transforms.Resize(img_size),
        transforms.CenterCrop(img_size),
        transforms.ToTensor(),
        transforms.Normalize((0.5, 0.5, 0.5), (0.5, 0.5, 0.5)),
    ]
)

# Dataset を作成する。
download_dir = "/data"  # ダウンロード先は適宜変更してください
dataset = datasets.CelebA(
    download_dir, transform=transform, download=True
)

# DataLoader を作成する。
dataloader = torch.utils.data.DataLoader(dataset, batch_size=batch_size, shuffle=True)
Files already downloaded and verified
重みを初期化する関数を作成する
論文に記載されている平均 0、標準偏差 0.02 の正規分布に従う乱数で畳み込み層の重みを初期化する関数を作成します。
def weights_init(m):
    classname = m.__class__.__name__
    if classname.find("Conv") != -1:
        nn.init.normal_(m.weight.data, 0.0, 0.02)
    elif classname.find("BatchNorm") != -1:
        nn.init.normal_(m.weight.data, 1.0, 0.02)
        nn.init.constant_(m.bias.data, 0)
Generator を作成する
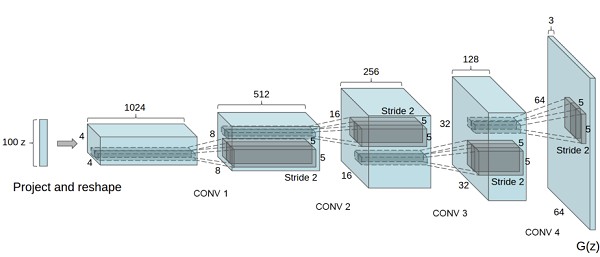
Generator は、ノイズ $\mathbb{z}$ (latent_dim, 1, 1) を入力として、本物と同じ形状の画像データ $\mathbb{x}$ (3, 64, 64) を出力する必要があります。モデル内で特徴マップの大きさを (1, 1) から (64, 64) までアップサンプリングするために、convolutional transpose layers を使用します。本物の画像データは値を $[-1, 1]$ の範囲に正規化してあるので、それに合わせて値域が $[-1, 1]$ である tanh 関数を出力層の活性化関数に設定します。
class Generator(nn.Module):
    def __init__(self, input_dim, n_features=64):
        super().__init__()
        self.main = nn.Sequential(
            # fmt: off
            # conv1
            nn.ConvTranspose2d(input_dim, n_features * 8,
                               kernel_size=4, stride=1, padding=0, bias=False),
            nn.BatchNorm2d(n_features * 8),
            nn.ReLU(inplace=True),
            # conv2
            nn.ConvTranspose2d(n_features * 8, n_features * 4,
                               kernel_size=4, stride=2, padding=1, bias=False),
            nn.BatchNorm2d(n_features * 4),
            nn.ReLU(inplace=True),
            # conv3
            nn.ConvTranspose2d(n_features * 4, n_features * 2,
                               kernel_size=4, stride=2, padding=1, bias=False),
            nn.BatchNorm2d(n_features * 2),
            nn.ReLU(inplace=True),
            # conv4
            nn.ConvTranspose2d(n_features * 2, n_features,
                               kernel_size=4, stride=2, padding=1, bias=False),
            nn.BatchNorm2d(n_features),
            nn.ReLU(inplace=True),
            # conv5
            nn.ConvTranspose2d(n_features, 3,
                               kernel_size=4, stride=2, padding=1, bias=False),
            nn.Tanh()
            # fmt: on
        )

    def forward(self, x):
return self.main(x)# Generator を作成する。
G = Generator(latent_dim).to(device)
# 初期化する。
G.apply(weights_init)Generator(
(main): Sequential(
(0): ConvTranspose2d(100, 512, kernel_size=(4, 4), stride=(1, 1), bias=False)
(1): BatchNorm2d(512, eps=1e-05, momentum=0.1, affine=True, track_running_stats=True)
(2): ReLU(inplace=True)
(3): ConvTranspose2d(512, 256, kernel_size=(4, 4), stride=(2, 2), padding=(1, 1), bias=False)
(4): BatchNorm2d(256, eps=1e-05, momentum=0.1, affine=True, track_running_stats=True)
(5): ReLU(inplace=True)
(6): ConvTranspose2d(256, 128, kernel_size=(4, 4), stride=(2, 2), padding=(1, 1), bias=False)
(7): BatchNorm2d(128, eps=1e-05, momentum=0.1, affine=True, track_running_stats=True)
(8): ReLU(inplace=True)
(9): ConvTranspose2d(128, 64, kernel_size=(4, 4), stride=(2, 2), padding=(1, 1), bias=False)
(10): BatchNorm2d(64, eps=1e-05, momentum=0.1, affine=True, track_running_stats=True)
(11): ReLU(inplace=True)
(12): ConvTranspose2d(64, 3, kernel_size=(4, 4), stride=(2, 2), padding=(1, 1), bias=False)
(13): Tanh()
)
)
Discriminator を作成する
Discriminator は画像データ $\mathbb{x}$ を入力とし、データが本物である確率を出力するモデルになります。 $[0, 1]$ の範囲の値を出力できるように、出力層の活性化関数はシグモイド関数を使用します。つまり、2クラス分類問題を解く CNN モデルと構造は同じです。 ダウンサンプリングには、通常使われる MaxPooling の代わりに stride=2 の畳み込みを行うことで代用します。畳み込み層にすることで、モデル独自のプーリング方法を学習できます。
class Discriminator(nn.Module):
    def __init__(self, n_features=64):
        super().__init__()
        self.main = nn.Sequential(
            # fmt: off
            # conv1
            nn.Conv2d(3, n_features,
                      kernel_size=4, stride=2, padding=1, bias=False),
            nn.LeakyReLU(0.2, inplace=True),
            # conv2
            nn.Conv2d(n_features, n_features * 2,
                      kernel_size=4, stride=2, padding=1, bias=False),
            nn.BatchNorm2d(n_features * 2),
            nn.LeakyReLU(0.2, inplace=True),
            # conv3
            nn.Conv2d(n_features * 2, n_features * 4,
                      kernel_size=4, stride=2, padding=1, bias=False),
            nn.BatchNorm2d(n_features * 4),
            nn.LeakyReLU(0.2, inplace=True),
            # conv4
            nn.Conv2d(n_features * 4, n_features * 8,
                      kernel_size=4, stride=2, padding=1, bias=False),
            nn.BatchNorm2d(n_features * 8),
            nn.LeakyReLU(0.2, inplace=True),
            # conv5
            nn.Conv2d(n_features * 8, 1,
                      kernel_size=4, stride=2, padding=0, bias=False),
            nn.Sigmoid(),
            nn.Flatten(),
            # fmt: on
        )

    def forward(self, x):
return self.main(x)# Discriminator を作成する。
D = Discriminator().to(device)
# 初期化する。
D.apply(weights_init)Discriminator(
(main): Sequential(
(0): Conv2d(3, 64, kernel_size=(4, 4), stride=(2, 2), padding=(1, 1), bias=False)
(1): LeakyReLU(negative_slope=0.2, inplace=True)
(2): Conv2d(64, 128, kernel_size=(4, 4), stride=(2, 2), padding=(1, 1), bias=False)
(3): BatchNorm2d(128, eps=1e-05, momentum=0.1, affine=True, track_running_stats=True)
(4): LeakyReLU(negative_slope=0.2, inplace=True)
(5): Conv2d(128, 256, kernel_size=(4, 4), stride=(2, 2), padding=(1, 1), bias=False)
(6): BatchNorm2d(256, eps=1e-05, momentum=0.1, affine=True, track_running_stats=True)
(7): LeakyReLU(negative_slope=0.2, inplace=True)
(8): Conv2d(256, 512, kernel_size=(4, 4), stride=(2, 2), padding=(1, 1), bias=False)
(9): BatchNorm2d(512, eps=1e-05, momentum=0.1, affine=True, track_running_stats=True)
(10): LeakyReLU(negative_slope=0.2, inplace=True)
(11): Conv2d(512, 1, kernel_size=(4, 4), stride=(2, 2), bias=False)
(12): Sigmoid()
(13): Flatten()
)
)
損失関数とオプティマイザを作成する
# 損失関数を作成する。
criterion = nn.BCELoss()

# 学習過程の Generator が生成する画像を可視化するためのノイズ z
fixed_z = torch.randn(64, latent_dim, 1, 1, device=device)

# ラベル
real_label = 1
fake_label = 0

# オプティマイザを作成する。
G_optimizer = optim.Adam(G.parameters(), lr=lr, betas=(beta1, 0.999))
D_optimizer = optim.Adam(D.parameters(), lr=lr, betas=(beta1, 0.999))
Discriminator を学習する関数を作成する。
def D_train(x_real):
    D.zero_grad()

    # 損失関数を計算する。
    # 本物のデータが入力の場合の Discriminator の損失関数を計算する。
    y_pred = D(x_real)
    y_real = torch.full_like(y_pred, real_label)
    loss_real = criterion(y_pred, y_real)

    # 偽物のデータが入力の場合の Discriminator の損失関数を計算する。
    z = torch.randn(batch_size, latent_dim, 1, 1, device=device)
    y_pred = D(G(z))
    y_fake = torch.full_like(y_pred, fake_label)
    loss_fake = criterion(y_pred, y_fake)

    loss = loss_real + loss_fake

    # 逆伝搬する。
    loss.backward()

    # パラメータを更新する。
    D_optimizer.step()

    return float(loss)
Generator を学習する関数を作成する。
def G_train(x):
    G.zero_grad()

    # 損失関数を計算する。
    z = torch.randn(batch_size, latent_dim, 1, 1, device=device)
    y_pred = D(G(z))
    y = torch.full_like(y_pred, real_label)
    loss = criterion(y_pred, y)

    # 逆伝搬する。
    loss.backward()

    # パラメータを更新する。
    G_optimizer.step()

    return float(loss)
Generator で画像を生成する関数を作成する。
データを生成するときは、勾配情報を不要なので、torch.no_grad() コンテキストで実行します。
def generate_img(G, fixed_z):
    with torch.no_grad():
        # 画像を生成する。
        x = G(fixed_z)

    # 画像を格子状に並べる。
    img = torchvision.utils.make_grid(x.cpu(), nrow=8, normalize=True, pad_value=1)
    # テンソルを PIL Image に変換する。
    img = transforms.functional.to_pil_image(img)

    return img
GAN の学習を実行する
CNN のモデルなので、学習には時間がかかります。 GeForce GTX 1080 で実行したところ、1エポックあたり5分弱、10エポックが完了するまでに1時間程度かかりました。
def train_gan(n_epochs):
    G.train()
    D.train()

    history = []
    for i_epoch in range(1, n_epochs + 1):

        D_losses, G_losses = [], []
        for x, _ in tqdm(dataloader, desc=f"epoch {i_epoch}/{n_epochs}"):
            x = x.to(device)
            D_losses.append(D_train(x))
            G_losses.append(G_train(x))

        # 途中経過を確認するために画像を生成する。
        img = generate_img(G, fixed_z)

        # 途中経過を記録する。
        info = {
            "epoch": i_epoch,
            "D_loss": np.mean(D_losses),
            "G_loss": np.mean(G_losses),
            "img": img,
        }
        history.append(info)

        # 途中経過を出力する。
        display(img)

    history = pd.DataFrame(history)

    return history


history = train_gan(n_epochs)
損失関数の値の推移を描画する
def plot_history(history):
    fig, ax = plt.subplots()

    # 損失の推移を描画する。
    ax.set_title("Loss")
    ax.plot(history["epoch"], history["D_loss"], label="Discriminator")
    ax.plot(history["epoch"], history["G_loss"], label="Generator")
    ax.set_xlabel("Epoch")
    ax.legend()

    plt.show()


plot_history(history)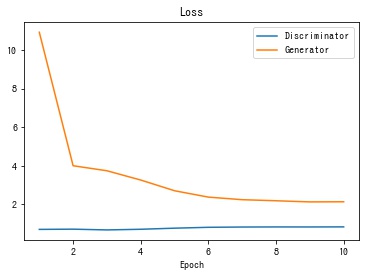
生成される画像の推移を gif 動画で保存する
pillow を使用して、各エポックの生成画像を gif 動画にして保存します。
def create_animation(imgs):
    """gif アニメーションにして保存する。
    """
    imgs[0].save(
        "history.gif", save_all=True, append_images=imgs[1:], duration=500, loop=0
    )


# 各エポックの画像で gif アニメーションを作成する。
create_animation(history["img"])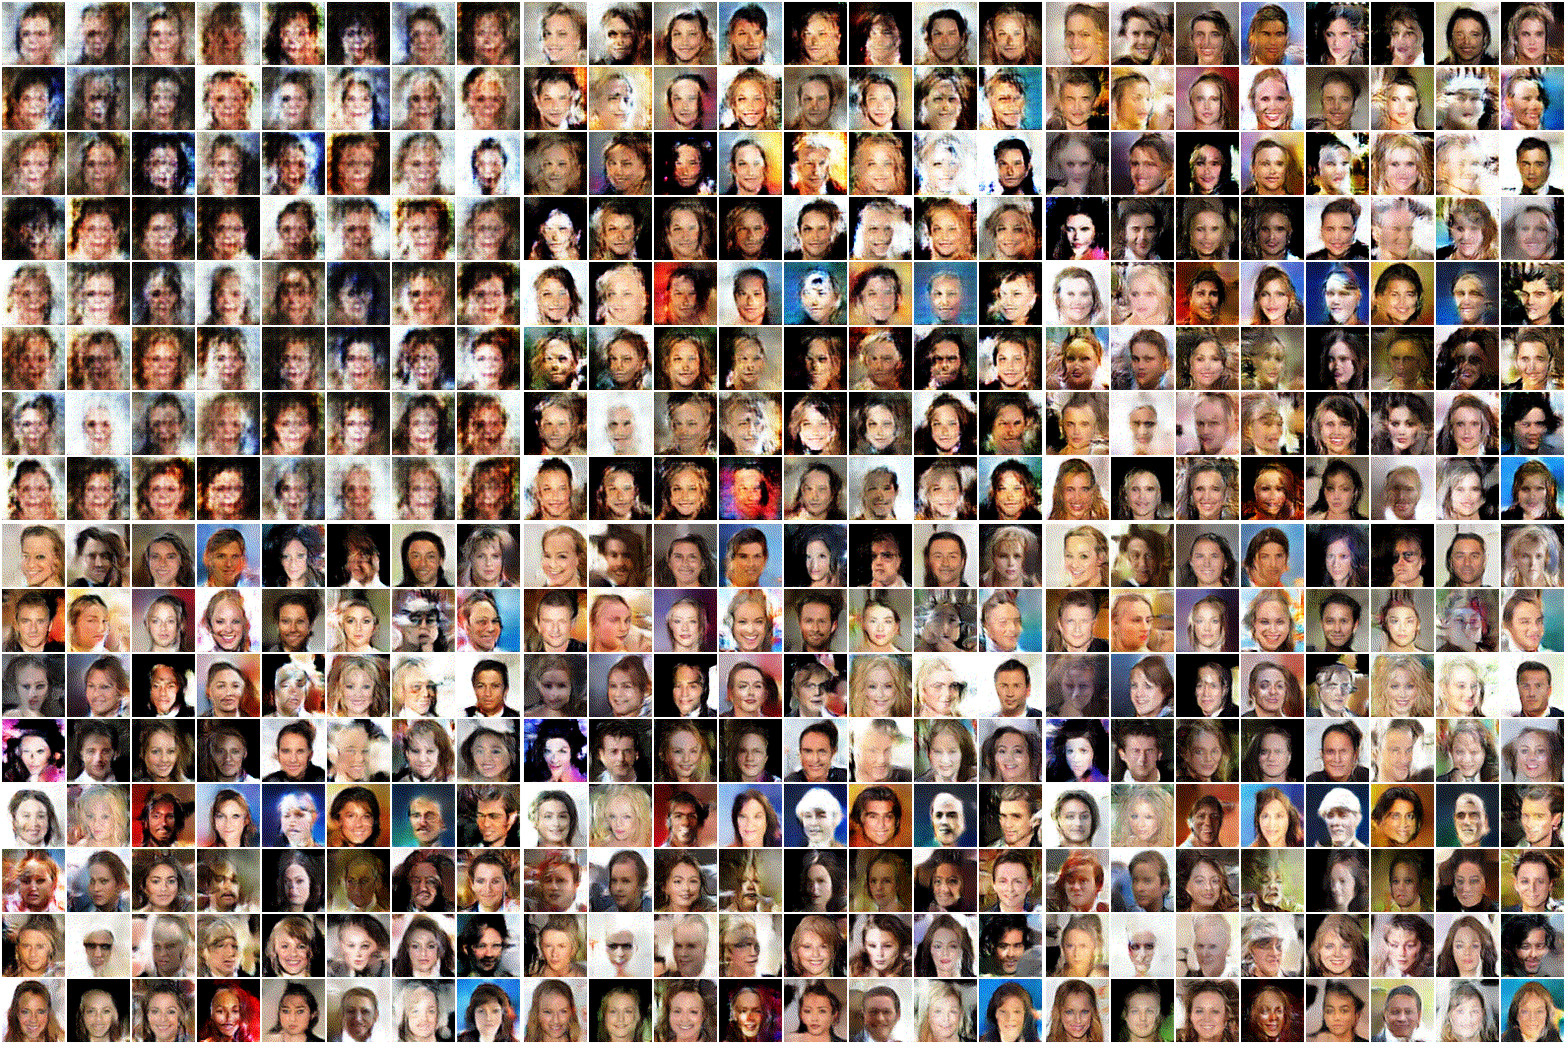
学習が終了した段階の Generator が生成する画像を表示します。 一部崩れていたり、ぼやけている部分がありますが、人の顔であると認識できるレベルの画像が生成できることが確認できました。
# 一番最後の画像を表示する。
display(history["img"].iloc[-1])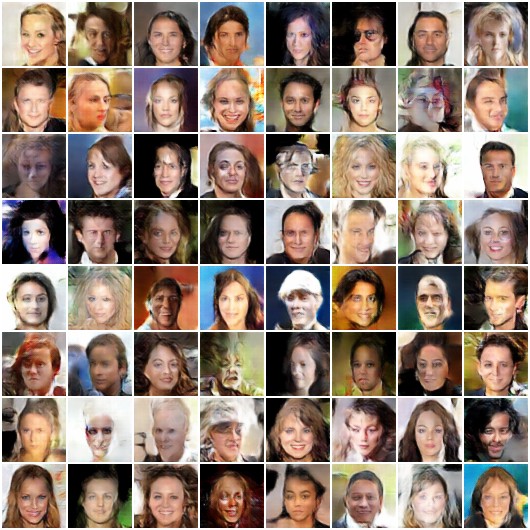


コメント